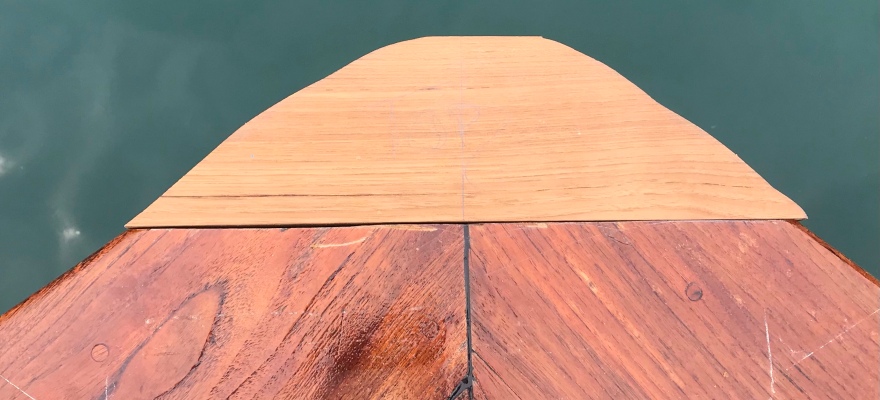
Pleased to be able to repair damage to the bow of Alhambra. Damage caused during the Mankhut major typhoon.
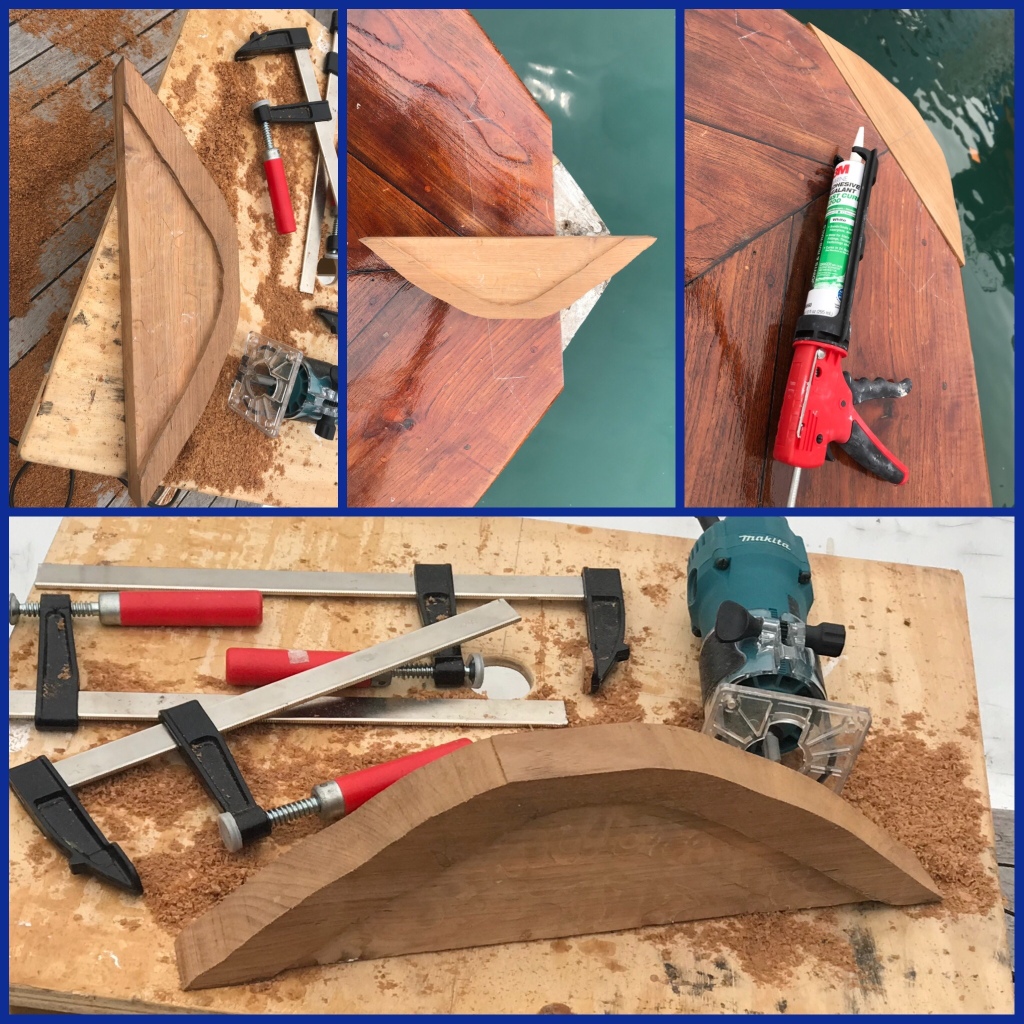
Next task – shaping time.

Pleased to be able to repair damage to the bow of Alhambra. Damage caused during the Mankhut major typhoon.
Next task – shaping time.

I see a crack in the outside roof surface of my boat. And I know it needs to be dug out, filled, primed and painted. And here is a short tale of the next steps and the reality of persistence.

No worries, he says, I’ve done it before, and I can do this again. Bring forth optimism…
So the digging out begins, worryingly leading to more and more of the Gelcoat being removed. OK, I fill it, sand and paint it with International Yacht Primer Coat.

Worrying as the first layer of primer goes on I come to realise that the cracks need to be dug out some more. The outside surface of the vessel gets beaten big time by the elements so it is really important that I complete this job the right way.
And I will.

So I dug it out and the next thing I have is a large gaping wound on the surface.
The reality of repairing this and creating a weatherproof finish is quite daunting, I dig deep, take a few deep breaths – have a cuppa tea, keep calm and carry on.
I could do the filling but know that I am not a very good plasterer, that it’ll take me ages and I’ll do a moderate job. So I requested a plasterer from the Sun Hing Shing shipyard to come and help me do the job.

Thanks to the shipyard for helping me get that done. From there it remains a case of sanding to a 400 grit level and then applying the paint. The process requires four layers of International Yacht Primer and then four layers of International Toplac topcoat.

With the need for drying and sanding between layers, it’s almost been a coat a day when possible.
However, Hong Kong’s temperature has dropped to teenage levels and the rain’s been interrupting progress too.
I managed to get the first coat of International Toplac topcoat on just before the Xmas daze.

I will be replacing the window sealant once I get the main area covered. I plan to move from black sealant to white sealant, hoping white will retain less heat.
More to follow.

Pre-Covid trickery, I was paid an orange Bic ‘Scapa’ sit-on Kayak and paddle. An avenue towards health, strength, wellness and cruising around near the sea. The Kayak became a frequent and enjoyable hobby.

I’m not attempting Military Kayak drills (Sorry Brodie) but have thoroughly enjoyed my outings to date.
Sadly a local Sampan sideswiped the Kayak. The side pressure resulted in the Kayak’s Starboard top centre edge exploding open.

Knowing it would be skirting near danger to use the Kayak in such a condition, I removed it from the water and added a Kayak repair project to my to-do list.
Many years ago whilst teaching technology literacy to HKIS Middle Schoolers, I recall coming across a great video resource that rapped amongst graffiti to how the internet had infinite power to educate.
Enough said: search ‘Plastic Kayak repair’
So I needed to get a Plastic Welding Iron, orange Polyethylene strip, wire mesh. It was surprisingly tricky to pick up a Plastic Welding Iron (not a soldering iron) in a hardware shop.
Of course, the internet saved the day.

Tooled up, I set about repairing the Kayak.
To start, I carefully spot welded the split together, gradually melting the two sides together. With the edges together, I melted a steel mesh across the top ridge and sides. And finally, I welded five twelve-inch by quarter-inch orange Polyethylene plastic strips across the area.

NOTE: take care as you melt the plastic’s together. The plastic will melt away quickly, and you’ll end up with an unwanted hole in the Kayak if you’re not careful.
I must add that I have not spent any time attempting to address cosmetic issues attached to this repair.

With ropes replaced and the hull finely sanded, the Kayak has returned to the sea.
I hope the repair is strong enough to deal with the sea.
I will find out.


Well i must say, as with a lot of things: that took longer than I thought it would. What i thought was going to be a quick sand-down and re-varnish project has been a different story.
With the Teak upper-deck table having been weathered for years, joins required re-fixing and edges needed realignment.
Easier to type than do… just saying.

The underside of the table had ‘Hard-as-nails’ placed into seams to help keep the pieces in place, and five layers of varnish . The earlier layers starting with a 25:75 – thinner:varnish mix graduating to 100% varnish on the top three layers.
The top layer of the table has the joins filled with black caulk and six layers of varnish added.

Reflecting on the process, a few things stand out as elements to learn from:
I’ve put a few images snapped along the way below.


Some time with a heat gun, sander, elbow grease and things start to get better. Helping a friend tidy up an upper deck teak table. Getting there.

It is always satisfying to be able to say “Done”.
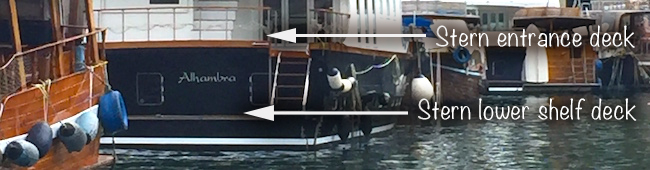
Both decks, the Stern lower shelf deck and the Stern entrance deck have been sanded, caulked, cleaned and sealed.
Two products have been used:

Mattco has been used on the Stern lower shelf deck. Easy to apply and quick to soak in / dry. The product has a very slight amber grey tone to the finish.
At this stage I am thinking value for money.
Time will tell.
The Semco – natural tone has been used on the Stern entrance deck.
Again, easy to apply, quick to dry and even better – water based so the brush can simply be washed with warm soapy water.
The product finish is great, a amber glow remains in the teak.
It is a slightly more expensive product but at this stage I’m leaning towards it as a better choice.
Semco offer colour tones but Hong Kong will not permit them into the region as they contain damaging elements. I like how the product is also environmentally sound (ish).
I began with a plan to compare products, improve work efficiency and product effectiveness.
My new caulking applicator has enhanced the caulking process heaps. The Teak Decking Systems SIS 440 caulk sausage is also a grand choice.
The use of water based product has also saved a load of phaffing about with cleaning brushes.
The product effectiveness will be shown over time.
As already said. I prefer the finish to the Semco product.
All good.


I am aiming to clarify which I consider a better Teak sealant.
The contestants are:
One: Mattco Teak Sealer
Two: Semco Teak Sealer
Three: Star Brite Teak Sealer
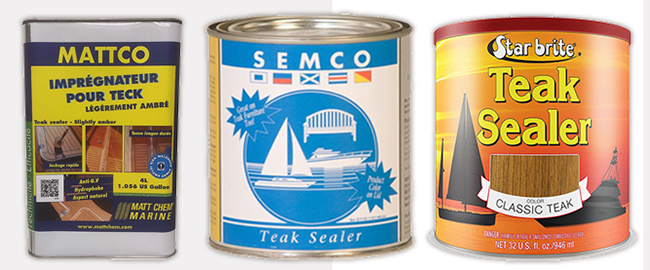
The Mattco product is the cheapest of the three products (HKD 298). The Star brite being almost twice the price of Mattco product, and not surpisingly the Semco sits in the middle.
I am not going to simply launch myself onto the idea that the most costly will be the better product.
I have used the Star brite product on many occasions and it is indeed a very effective product. I used the darker of the teak sealer products and it amost felt like paint. Even the caulk was sealed, and coloured.
At half (+) the cost of Star brite, I am curios to see how the Semco and Mattco compare.
I have 2 teak decks that I am going to use as a direct comparison.
One, Stern entrance deck
Two, Stern lower shelf deck
So here we go.
May the first, twenty twenty marks three years since I resealed Alhambra’s stern entrance Teak deck.
It’s time to do it again. The difference I am hoping for this time is improved work efficiency and product effectiveness.

The process will be:
For sanding, I am using a Makita BO5031 Orbital Sander with
60 & 150 grit 5″ sanding discs, and lots of them.
With absolute respect for safety, I wear a full face respirator with earplugs.
After sanding for nearly 2 hours – it becomes a weird space… and a relief to get the mask OFF.

At this stage, we (my wife has been helping 🙂 have sanded and removed the cracked and leaky caulk from the Stern entrance deck.
Next step is to recaulk.

I will update when both are done 🙂
